Wednesday, December 23, 2015

Flurries of Fun

 
This project actually took place in the summer, but I've gotten busy and had to wait for Christmas break to display my beauties.
 
Starting with regular white printer paper (8.5" x 11") you first chop of 2.5" so that you can make a square.


From there you fold the opposite corners inward.
 
 
Make sure you press firmly down the middle to create a sharp edge for easier folding.
 
 
Again, you fold the corners in.
 
 
One more time! You can fold your snowflake more than this, but this thickness is optimal. The edges are easiest to cut if they are thin, and the more times you fold the snowflake, the thicker they become.
 
Your final fold should look like this.
 
 
In this picture, my pointer finger is indicating the area of the triangle that will become the center of the snowflake. Of the three triangle corners, this one is entirely comprised of folds.
 
 
Next, we start cutting. I usually start by clipping the centerpiece.
 
 
Remember, your edges are your greatest asset. If your snowflake was folded and remains fairly thin, you may be able to cut some designs in the center, though these cuts are more difficult.
 
 
Next is the top, what will be the edge of your snowflake. Triangles are your friends.
 
 
Then we get to start unfolding!
 
 
Viola! The finished product!
 
 
I churned out about 60 "snowflakes" this day, so I'm grossly unaware of the patterns I used to make these. However, I have them displayed here all the same so you can use them as inspiration (and I've given them names just to make it fun!).

What are some of your favorite snowflake designs? Do you like the curvy ones or designs with sharper edges?
 
Happy crafting!
______________________________________________________________________

1. The Kaleidoscope
 
 
______________________________________________________________________

2. The Celtic Symbol
 
 
______________________________________________________________________

3. The Minecraft
 
 
______________________________________________________________________

4. The Alien Eyes
 
 
______________________________________________________________________

5. The Blocky Christmas Star
 
 
______________________________________________________________________

6. The  Flowy Christmas Star
 

And That's a Wrap!

 I had the pleasure of attending the beautiful outdoor glass chapel wedding of one of my friends this Autumn. Having the gifts in two separate boxes, I wanted to ensure that they stayed together. Using burlap ribbon infused with gold specks, I pulled the pieces together. To hide the crossing point of the two ribbons, I added a bow to the top.
 
I used gold, glitter ribbon to make the bow (because the only time we have bows in our house is Christmastime). Following this tutorial, I was able to make a lovely bow just the size that I needed for my project.

 
Knowing how easily bows can be made, I may broaden my horizons and create bows from various materials. What are some materials, other than ribbon, that you want to repurpose into a bow?
 
Happy crafting! 

Thursday, December 10, 2015

Mug Warmer

I thought a mug warmer would be a fun, and useful, item to crochet. I used this pattern from JoAnn's, with slight tweaking for yarn weight and mug size.


This was my piece before connecting the ends. It fit snug around the glass that I had with me at work (yes, because I crochet on my lunch break). With a little stretching, the piece fit much better.


Using the tails, I weaved the two sides together at the top and bottom. The last step is attaching a button to one side to unite the piece underneath the mug handle.


This is another warmer I made with a dip for the mouth; made using slip stitches.


Friday, October 2, 2015

It's Fall in the Details


This is a great way to get prepared for Fall, one of my favorite seasons! For this project I started out with a small wooden wreath, but you can use any wreath base you choose. Then I wrapped it in raffia which I used to make the bow.


Next I gathered the leaves and positioned them on the wreath where I wanted them.


I then hot glued them on one by one.


I chose a burlap-looking paper which I glued atop cardboard for added support. Then, I used my chosen stencil to trace my letter onto the paper.


After cutting out the letter, I positioned and glued it to the wreath.


And alas, the finished product is ready to hang!

Falling for Quilts


I cannot tell you how happy I was to work on this project. This is the first quilt that I have made, and I put this lap quilt together by my own ingenuity without tutorials or study. This is the most wild thing I have done my entire life! :)
 
I started by choosing my fabric and cutting out as many 3.5" x 3.5" squares I could make from each piece. I came out with a little more than 160 squares, and decided to make a 10 x 16 square lap quilt.


My next step was to sew the squares into strips and then sew the strips together. I was pleasantly surprised to find that many of the corners matched up very well.
 
 
After the entire top was pieced, I cut the muslin that I used for the back.
 
 
While I was cutting the fabric for the back, I also cut strips that I used for the edging.
 
 
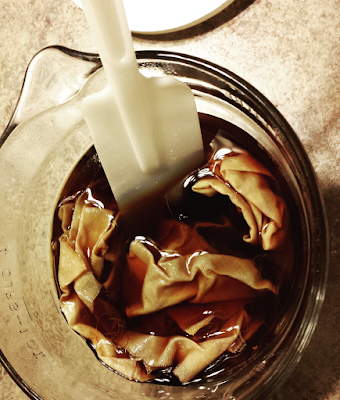
Since the back and the edges are muslin, I wanted to make sure there would be a noticeable color difference. To darken the color of the edging pieces I coffee stained them overnight.
 
 
Next, I cut my batting and pinned the top, batting, and back together.
 
 
From here, I hand sewed the three layers together in a triangular pattern.
 
 
As a side bar, one of the times the thread got tangled it shifted into the shape of a beautiful treble clef and I could not resist sharing this. Now, back to the quilt!
 
 
I used the machine to sew the edging onto the front, and then hand sewed the edging on the back side.
 
 
My corners are a bit rough, but with diligent hand sewing I was able to make them kind of corner-y.
 
 
And here's the finished lap quilt, my lovely little creation!
 
 
Hopefully this project has been helpful, or even inspirational. Happy crafting!

Tuesday, September 8, 2015

Necklace Remake

This is an original craft! I found this cute necklace broken by its lonesome at a reduced priced, so I have taken it upon myself to turn it into a treasure!

I'm guessing the middle bead in the center of the necklace was supposed to have a little ball on both sides, but, as you can see, there is only one on the right.


...So I removed the middle bead. In my personal opinion, the necklace look a little bit bulky anyhow.


To streamline the necklace some more, I removed the big bead on each side of the middle bead. (They are in the bottom left corner).


I added hooks to these two bead and made a matching earring set for the necklace.


Viola!! The finished product.
 
 
Tell me what you think! Comment for any thoughts or ideas, and happy crafting!

Friday, August 7, 2015

Lego my Sugar Cookies

 
 So today I decided to whip up some Lego themed sugar cookies. I began by mixing my regular "homemade" sugar cookie dough (complement of Betty Crocker).
 
 
I next used a knife to cut the dough into squares with small rectangles left on top.

 
I made icing using a combination of powdered sugar, corn syrup, and  milk. While I commonly use around one tablespoon of corn syrup, the other two ingredients vary based on the amount I am making. I start with two cups of powdered sugar and add the milk by tablespoons until I have the proper consistency.
 
The "sweet spot" for icing consistency is usually found when you drag your spoon through the mixture (scraping the bottom) and you can see the bottom of the bowl for a second or two before it is covered by the mixture. I add the powdered sugar by the cup and milk by the tablespoon until I have the right amount with the right consistency.
 
I then cover all of the cookies with a sheet of yellow icing. I fill about one third of the spoon with icing and then I put this icing on the cookie while spreading across the surface with the back of the spoon. I use very small amounts on the spoon if more is needed, or I use a toothpick in a like manner as the spoon, especially to get the edges.
 
 
I whip up a smaller amount of black icing and use a toothpick to apply the faces.
 
 
I then configure them on a platter and share the smiles with all of my friends!
 
 
What are some cookies decorations you would like to see? Happy crafting (baking)!